VAD-06 Customization
Pete Quin: VAD-06 Customization
Hello Voyage Air!
I’m a working guitarist in the UK with over forty years professional experience, and for a long time I supported this habit (don’t play guitar and expect to get rich!) repairing, setting-up and occasionally building guitars. So there’s nothing I haven’t seen in guitar construction. Until, that is, I went to Mandolin Brothers in Staten Island two years ago and Stan raved to me about this amazing guitar he’d just got that folded up! Cut to the chase, I bought one.
Amongst guitar techs I know, some of whom I’ve even taught, there is a general opinion that no guitars come in new the way you want it to feel, regardless of manufacturer. Everything benefits from work to make it suit your style. It’s just the way I am with any of my guitars: I set to work on my new Voyage Air VAD-06.
Firstly, in general, the changes I made to the VAD-06 were not particularly made to improve the sound, although I think there has been some small improvement. They’ve been made to significantly improve the play-ability. I believe that a guitar should be warm and snugly, it should say ‘stroke me, you won’t regret it’, it should be comfortable, even easy to play, you shouldn’t get tired, sore fingers after an hour or two.
And I also believe that an acoustic should be able to take a similar setup to a solid bodied guitar. The vast, vast majority of the acoustics I’ve met over the 46 years I’ve been playing come from the factory, as too high, too hard, and too tight. I think this is probably to give them the most projection, and perhaps to give the typical flatpicker a fuss-free and buzz-free ride (think bluegrass in anger!). I’m okay with this, because it puts much more stress on the instrument, so makes it easier for me to judge what I can get away with if I choose to try modifications – almost everything I do will allow the guitar to relax a bit.
I do agree that if I pulled a high-end Gibson or Martin of the shelf, or even one of your own high-end models … I would probably want to make these mods, to a greater or lesser extent as necessary, and they would improve the guitar (‘improve being my own judgement, of course – other players might think I’d ruined it, though guitarists actual reactions to what I do suggest they’d just smile and play it until I pulled it out of their hands).
At this point, I want to say that what I do isn’t very revolutionary – I’m sure any competent guitar tech could do it just as well or better, it’s just that I’m ready to have a go at any aspect of the guitar in the stupid belief that I can make it better, but I’ll only do it on guitars that are already good and well-made. Like my new Voyage Air.
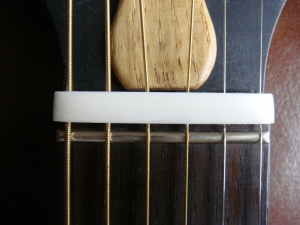
Where did I start? The nut – well, that’s an easy one. String spacing at the nut makes a huge difference to the feel of the guitar over the whole of the fingerboard. And the equal holes in the Voyage Air captive nut make the string spacing really odd. Again, just my opinion. Actually, I found myself staring at the nut on mine, seeing the odd spacing, and wondering why it was so odd. It’s a subtle oddness. Then I noticed the holes, and realized that obviously, you have to make sure that the holes are large enough for the strings, but does a skinny first need the same size as a beefy sixth?
I created a new ‘captive nut’ carved from buffalo bone – not fancy, but neat. I looked at possible string gauges, and decided to rule out silly sizes on the basis that anyone who wants to fit extra ultra super jumbo heavy strings won’t worry about the nut because the face will pull straight off anyway. Now, sorry, but my drills are metric sizes – we invented imperial measurements but now we’re in the EU and we sell apples in kilos and drills in millimeters…go figure. The holes I used, from 1st to 6th, are 0.6, 0.6, 0.8, 1.0, 1.2, 1.5 mm.
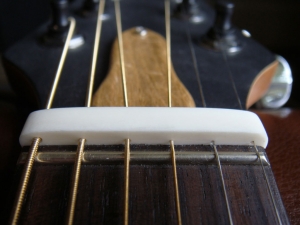
They are drilled in the same positions as yours. To ease the string’s exit to the rear, I used a conical diamond ream to open the rear side slightly – on yours, the thinner strings seemed to be cutting into the nut as they were pulled off line. The first two pictures show the front of the nut with individually sized holes. The second shows the even spacing across the fingerboard.
I also carved a new buffalo bone saddle, much lower that the one fitted, that gives me an amazingly low action, but one that can now be accurate with no rattle or buzz anywhere.
As to the bridge and saddle, if you’re confident about the fingerboard, a lower saddle might be considered, but the matter of the break angle can be addressed. Sorry if I’m telling you the obvious, but this is the angle the strings go down into the face at when they’ve come over the saddle, and it’s an important factor in how the vibration of the strings gets transmitted into the face, thus affecting both the tone and volume. As a rule of thumb, the closer you can get to a drop of about forty five degrees the better. The V-A strings are held in place by bridge pins, with the string going from the saddle to the front of the hole the pin goes into. Lowering the saddle lowers the break angle – bad thing!
However, a small change to the bridge can be quite useful. After removing the saddle, filing angled slots in the bridge using a parallel diamond burr angled at forty degrees down towards the pin holes, and from a millimeter or two from the saddle slot, effectively reinstates this ideal 45-degree break angle. Underneath the bridge itself is the face, and under that the ‘bridge plate’, and the end of this slot is somewhere in this sandwich, but the construct is pretty solid so I do not believe that this mod decreases the strength of the bridge assembly by any noticeable amount.
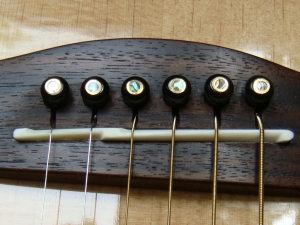
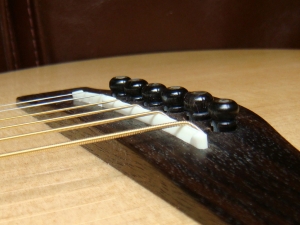
The third picture shows the lower saddle, the fourth the improved break angle, and the fifth the appearance of the bridge from above. The flashy bridge pins are there for appearance only – I don’t believe that they have any affect on the sound: they just look pretty.
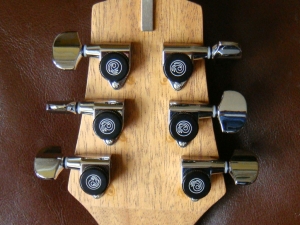
The sixth picture shows my choice with the installation of new machine heads. They’re Planet Waves locking tuners, which sit perfectly for height and the 18:1 ratio is excellent. Very pretty, they work very well, they cut the string automatically when you wind (whoo-hoo!), and the post height is fine. The screws are in different places, but colored wax hides the old screw holes very effectively.
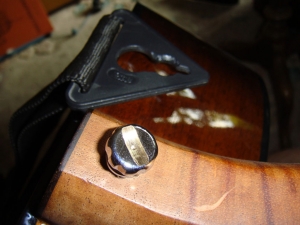
The final picture is a little change I made to the bolt that retains the neck. I’ve ground a rounded slot in the end which fits British pound coin, which can be used for a final tightening check if you’ve got any doubts. The soft edges of the bolt do make it hard to tighten really well, but I can understand a need not to tighten it really, really hard. Just looking for the middle ground. That’s why a pound coin. It’s not very big but quite thick. So the slot is wide enough to mean that bigger coins (easier to put force on with) slip out of the slot.
Also in the picture is the end of the nylon guitar strap. I chose one with a hard plastic end that ‘snaps’ over the strap pin. It’s shaped for the bolt so it holds securely but comes off easily, because there’s not a lot of space in the case for putting the guitar in with the strap on, so this system doesn’t wear out with off-on-off-on etc.
And for the big close – how many guitarists does it take to change a light bulb? Ten. One to change it, and nine to stand around saying ‘I could’ve done it better’.
Yep, understand that.
All the best,
Pete